


The year is being buffeted away by extremely strong winds this week, making room for the New Year and new opportunities! On January 10, 2011 the fiber pieces currently in the gallery will be removed and new pieces will be installed. The theme is "Hot Tropics - Warmth in winter’s freeze". How appropriate! Our gallery member Betty Ford and guest Diane Smith will share the responsibility of jurying new pieces of fiber into the gallery. Diane has been interested in fibers and textile arts for as long as she can remember but weaving is still her art of choice. Her specialty is designing scarves, shawls and other wearable items with variegated yarns. Betty is a nationally known quilter. You can see her work at http://www.bettyfordquilts.com/home.html
Please stop by the gallery and get warm!!!!
Tuesday, December 28, 2010
Monday, December 20, 2010
Samples of Silkscreening
Here is an example of silkscreening on silk broadcloth - it's important to keep your fabric or paper (substrate) pinned down firmly onto a printing table or on a frame, so it doesn't move as you lift the silkscreen off and move it to different locations on the fabric.
 In the sample above you can see several layers of silkscreening - the very large rectangular images done in a beige-gold color and then smaller rectangular images over them, done with gel medium and silver foil. Using the same shape (rectangle in this case) but combining different sizes or orientation help create depth and interest. This piece is fairly large (60" x 60"). IF you look closely you can also see some very small squares in a dark green-blue.
Hope your holiday shopping list is getting smaller - if your looking for a unique gift, stop by the Potomac Fiber Arts Gallery in the Torpedo Factory - we'd love to help you find the perfect gift.
Friday, December 10, 2010
Silkscreening basics
The supplies that you will need to start silkscreening are a silkscreen, a squeegee and paints or dyes -these are the basics and you can certainly bring more equipment to the party once you get familiar with the technique.
The first item is a squeegee - this pushes the paint or thickened dye through the mesh of the screen. It should be a size and weight that fits inside the screen (obviously!) but it also should fit comfortably in your hand as well. Squeegees are labeled by their durometer (70, 100). A durometer is a measurement of the hardness or softness of a material. A higher number means its stiffer (and for a silkscreening artist, harder to push materials through the mesh). I use a durometer 70 squeegee.

You need paints or dyes to push through the mesh onto your substrate. If you use dyes, they need to be thickened with a clear agent such as sodium alginate. This thickens the dyes and allows you to smoothly apply the dyes with the squeegee. Yes, it's messy!

The next item is the silkscreen. It consists of a wooden or aluminum frame with polyester mesh applied tautly to the back of the frame, allowing the artist to squeegy paints or dyes through the mesh. Silkscreens come in all sizes and are not that difficult to make yourself. Many years ago the mesh was made of silk, thus the legacy name.

If you used the screen just as it is to push dyes and paints onto the fabric or paper, you would end up with a large rectangle of color applied to the substrate, similar to the image below.

So artists use some form of resist with their silkscreen. A resist is a temporary or permanent material applied to the back of the silkscreen to prevent the dyes and paints from going onto the substrate which creates a pattern on the substrate. Resists can include masking tape, freezer paper, wax, glue, flour paste, rice paste - anything that will prevent the dyes from transferring to the fabric. The following silk pieces have had paints and or dyes applied by using different silkscreened patterns.


Next time we'll look at using different resists on the back of a silkscreen, such as soy wax, freezer paper and masking tape to make different patterns.
Saturday, December 4, 2010
Getting in the Holiday Spirit
Hello and welcome to the Potomac Fiber Arts Gallery (PFAG) - my name is Ann Graham and I'll be your host and tour guide for the month of December, 2010. As you may have already sensed from earlier posts, PFAG members exhibit and sell juried items in the gallery, so we hope you'll stop by during the holiday season to find that special, unique gift - for a loved one or for yourself!
I work with silk materials, using silkscreening methods with different methods of resists. My goal is to create multiple layers of color, images and textures on one piece of art to add depth and interest to the silk.
During this month, I'll be explaining what silkscreening is and then demonstrate different resist methods that can be combined with silkscreen techniques. If you have any questions or comments, please submit them and we'll respond as promptly as possible.
Monday, November 29, 2010
Brick Stitched Beadwork continued
3 Dimensional Figure "Emergence" in brick stitch by Gladys Seaward


The following are 2 Dimensional figures in brick stitch by Joanne Strehle Bast. Note that the original "bead ladders" with which brick stitch is started can be bent into any shape and used to "draw" the figures. The direction of design lines can be changed at any time by throwing another bead ladder and stitching off of the new line. Changing bead sizes also help indicate which limbs and/or torsos are in the fore and which are behind.
Charleston and Swing dance couples by Joanne Bast

Disco Dancers with their disco ball

Positioning the 3 sets of dancers into the desired composition

Filling in the background to produce the final 19"x 12" piece of beadwork "Clubbing the Night Away". Note the contrast of the straight lines of beads that the brick stitch produces within the figures and around the frame with the more amorphous background stitching. This helps the figures stand out from the background.

The final project involves photographing the beadwork and reducing it to the size of a playing card, the three sets of nightclub dancers from three different eras representing the Six of Clubs.

So we now come to the end of the month. I have been delighted to be the Potomac Fiberarts Gallery blogger for November. I will now pass the baton on the another member to continue for December. I will return as the blogger for the month of April.
The gallery is filled with fantastic fiber gifts. The Torpedo Factory (105 N. Union Street, Alexandria, VA 22314) of which we are a part will celebrate a Holiday Open House December 2 from 6-9PM in addition to our regular hours. Please visit. Joanne
Monday, November 22, 2010
Beadwork in Brick Stitch


This produces a flat piece of beadwork with a flat top and bottom row and staggered sides. Patterns may be produced by varying colors to create horizontal lines and diagonals but not verticals.

If you turn brick stitch on its side, it appears to mimic peyote stitch and visa versa. However, the stitches are not interchangeable. Peyote stitch involves stringing beads along in a straight line, interlacing into the line below while in brick stitch, the thread changes direction doubling back on itself with each additional bead. As a result, peyote stitch is more flexible that brick stitch and more appropriate for things that drape while brick stitch is used for vessels and structures that need to have more body.
The following sculpture is a peyote stitched one of mine: USA Duffle Bag I:

It is the first in a series, where the second was done in brick stitch. The brick stitched one is much stiffer as brick stitch contains more thread per bead as well as having the thread pull in two directions each stitch. The lettering (USA) had to be done differently due to the different handling of horizontal vs vertical lines. In addition, the colors of the peyote stitched bag appear brighter as the thread is almost completely hidden within the beads. In the brick stitched version, thread can be seen peeking out between the rows of beads, dulling the colors, but assisting in blending.
USA Duffel Bag I; peyote stitch:

USA Duffel Bag II; brick stitch:

These are necklaces of mine (Joanne Strehle Bast) where I used flat brick stitch to support artist fused glass pieces. Note, however in the back views, that the small rolls through which the strung cord is threaded are peyote stitch--peyote rolls better.


Brick stitch may be done flat, in a circle, in a tube, or freeform. Gladys Seaward creates a necklace of circular brick stitching.

I also used circular brick stitch to form the base of the Butterfly brooch.

"Summer Kite Vessel" By Joanne Bast is a container sculpture whose bottom begins with circular brick stitch then continues up the sides in a tubular brick stitch. Note the use of diagonal lines in the design.


While peyote stitch is begun by stringing a sequence of beads on a thread so that the beads are arranged hole to hole, brick stitch is begun by constructing what is called a "bead ladder". In a bead ladder, the beads are arranged standing upright like little soldiers, side to side with a thread bridge extending from the top of one bead hole to the top of the next and the bottom of each bead hole to the bottom of the next. This produces a bead snake that can be bent into any shape and fixed in that bent position by increasing and/or decreasing in the adjacent rows. This makes brick stitch especially useful in producing leaves and flowers with an organic feel as in the leaf earrings, ladybug brooch and starfish necklace by Joanne Bast.


Continuing further in this flexibility of line that brick stitch allows is Joanne Bast's "Tap Soul" where beads are actually stitched to wired taps. Each letter in the words STEP_STAMP_STOMP begins with a separate bead ladder which is squished into letter shape and then fixed in place by shaping the adjacent rows of brick stitch.

"Ode to Hundertwasser", also by Joanne Bast consists of brick stitching surrounding a rock to create a sculpture that derives motifs from the paintings of Hundertwasser. Note the shaping of the curving lines and the use of different sized beads to taper the lines.

Another of the advantages of brick stitch is the ease with which different sized beads may be incorporated together. In peyote stitch, each new bead must fit into the space between two existing beads-larger beads may be squeezed in, but their is a limit to how big. Brick stitch has no such limit as can be seen in Joanne Bast's unfinished "Shadows of the Shaman" figure where very large beads are incorporated along with very small beads to shape the petroglyphic inspired figure.

Figures in brick stitch are a special fondness of mine. Swingtime is a brooch.

The African Dancers are ornaments that hang.


I have also done several dancing couples including Charleston, Swing and Disco. I will refer you to my own blog archives of Dec 2009 for these. Older archives follow their construction in detail.
Finally I would like to include some pictures done in brick stitch. First is "Starry Night" after the painting by Van Gogh. Note the energy that the changing direction of design lines gives. The picture would be less dynamic if gridded into peyote stitching or loomed work.

Second is "Coral Sea" where fish and corals are pictured in brick stitch. The tendrils wrapping around the plexi armature are constructed of more flexible peyote stitch. Changing back and forth from one beadwork stitch to another allows me to use each stitch to its best advantage.

I will end today with an unfinished piece "No Where Is An Island", my most ambitious piece so far inspired by a trip to the Figi Islands combined with a 1996 Israeli rocket response attack meant for Hezobolah targets that hit a refugee camp under the control of UN soldiers from Figi. It struck me that even what most people consider a secluded island paradise is not unaffected by events halfway around the world. This is the top half of the piece, the bottom segways into peaceful tropical scenes. I have chosen brick stitch for this scene as I feel that it will give me the freedom of expression as well as the functional stability of a large piece of work. Joanne

Friday, November 19, 2010
Felting Study Group
The Potomac Fiberarts Gallery is composed of members of the Potomac Fiberarts Guild. Not all members of the Guild are members of the Gallery, but all members of the Gallery must first be members of the Guild. The Guild meets the second Saturday of each month and often has nationally known speakers and workshops in various aspects of fiberarts. In addition, the guild has several small study groups which meet on a regular basis to study one facet of fiberart in more depth. Study groups include but are not limited to wearables, felting, dying, metalwork, color, design, and weaving. We push each other to learn new techniques. Many of the items we work on in the study groups lead to items that end up in the Gallery.
Yesterday, I attended a meeting of one of the felting study groups (felting is so popular, there are 2 study groups) which was held at the studio of Bev Thoms in Dickerson, MD. In addition to studying felting in general, we are preparing for an exhibit that will be held March 10 through April 2 at the Allegany Arts Council's Saville Gallery in Cumberland, MD. Bev's studio will also be on the Countryside Artisan's Studio Tour Dec 4-6 and 10-12 where many felted as well as other items will be available for sale.
Zita, Roz and Francine prepare their tables for felting by covering them with plastic.

Wool is fiber derived from sheep. The individual hairs have scales that when heated and/or agitated slide over each other and lock together forming a mat know as felt. Here Roz is preparing to lay out wool roving (wool fiber that has been cleaned, smoothed out or carded and dyed) from her stash bags.

Francine is in the process of laying out thin layers of wool. She will cross the first layer with other layers going in opposing directions. Is a scarf on her mind?

Bev is laying out a single layer of wool onto a backing of cotton gauze. When the wool shrinks, the cotton will ruffle. Silk is also used in combination with wool to produce thin airy felts referred to as nuno.

Bev is rolling wool fibers into a tiny cord in preparation for decorative elements.

Bev is now adding the decorative details to her prospective table runner.

Roz has laid out wool in a specific shape with plastic between layers to produce a hollow form.

Zita is laying out wool to form a flower with plastic resists between the petal layers so that the petals do not stick together when felting.

After the wool is laid out on a plastic backing in whatever form the artist wants, the mass is covered with screen or netting and wet with warm soapy water, patted down to insure that the water has penetrated all layers and rolled up around a core such as a pool noodle and tied. The resulting log is then rolled back and forth to agitate the fibers into sticking together. Terri is rolling her piece by hand.

The log may also be rolled by foot.

Dallis is rolling a small amount of wool around some pencils to make a cylindrical wool bead. Note the finished pod structures felted by Roz on the wall.

Versatile Dallis rolls a her potential wool bead in her hand while at the same time rolling a larger piece by foot.

Terri unrolls her piece to check how well the fibers are sticking together. She will then roll is back up in the opposite direction and roll more. The rolling will be continues in all 4 directions until the piece is thoroughly adhered. The netting must be removed before it becomes enmeshed into the wool. The process of felting involves the wool fibers becoming attached into a mat. Agitation then continues as the fibers shrink and thicken. This process is called fulling.


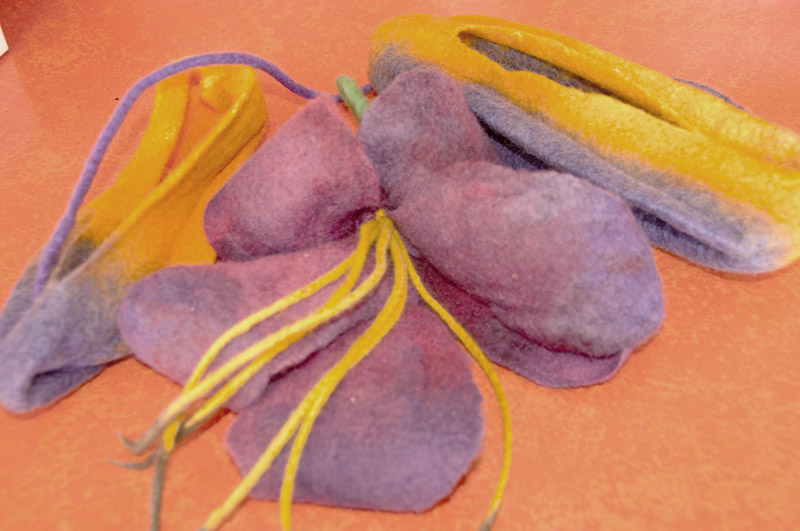
Finished flowers by Bev, Roz and Zita that may become brooches or an embellishment on another item such as a hat or purse:


A finished felted picture by Bev:

In addition, in preparation for our group exhibit, we are sampling ways to make a large installation piece to hang as a focal item in the Allegany Arts Council's Saville Gallery in March. This is the first trial of felting leaves onto tulle to produce a large piece to enhance out exhibit. You'll have to visit the exhibit to see what we finally come up with. Joanne


Yesterday, I attended a meeting of one of the felting study groups (felting is so popular, there are 2 study groups) which was held at the studio of Bev Thoms in Dickerson, MD. In addition to studying felting in general, we are preparing for an exhibit that will be held March 10 through April 2 at the Allegany Arts Council's Saville Gallery in Cumberland, MD. Bev's studio will also be on the Countryside Artisan's Studio Tour Dec 4-6 and 10-12 where many felted as well as other items will be available for sale.
Zita, Roz and Francine prepare their tables for felting by covering them with plastic.

Wool is fiber derived from sheep. The individual hairs have scales that when heated and/or agitated slide over each other and lock together forming a mat know as felt. Here Roz is preparing to lay out wool roving (wool fiber that has been cleaned, smoothed out or carded and dyed) from her stash bags.

Francine is in the process of laying out thin layers of wool. She will cross the first layer with other layers going in opposing directions. Is a scarf on her mind?

Bev is laying out a single layer of wool onto a backing of cotton gauze. When the wool shrinks, the cotton will ruffle. Silk is also used in combination with wool to produce thin airy felts referred to as nuno.

Bev is rolling wool fibers into a tiny cord in preparation for decorative elements.

Bev is now adding the decorative details to her prospective table runner.

Roz has laid out wool in a specific shape with plastic between layers to produce a hollow form.

Zita is laying out wool to form a flower with plastic resists between the petal layers so that the petals do not stick together when felting.

After the wool is laid out on a plastic backing in whatever form the artist wants, the mass is covered with screen or netting and wet with warm soapy water, patted down to insure that the water has penetrated all layers and rolled up around a core such as a pool noodle and tied. The resulting log is then rolled back and forth to agitate the fibers into sticking together. Terri is rolling her piece by hand.

The log may also be rolled by foot.

Dallis is rolling a small amount of wool around some pencils to make a cylindrical wool bead. Note the finished pod structures felted by Roz on the wall.
Versatile Dallis rolls a her potential wool bead in her hand while at the same time rolling a larger piece by foot.

Terri unrolls her piece to check how well the fibers are sticking together. She will then roll is back up in the opposite direction and roll more. The rolling will be continues in all 4 directions until the piece is thoroughly adhered. The netting must be removed before it becomes enmeshed into the wool. The process of felting involves the wool fibers becoming attached into a mat. Agitation then continues as the fibers shrink and thicken. This process is called fulling.

Finished flowers by Bev, Roz and Zita that may become brooches or an embellishment on another item such as a hat or purse:


A finished felted picture by Bev:

In addition, in preparation for our group exhibit, we are sampling ways to make a large installation piece to hang as a focal item in the Allegany Arts Council's Saville Gallery in March. This is the first trial of felting leaves onto tulle to produce a large piece to enhance out exhibit. You'll have to visit the exhibit to see what we finally come up with. Joanne

Subscribe to:
Posts (Atom)