Showing posts with label silk paper. Show all posts

Thursday, January 26, 2012

Design decisions


The fiber art in our gallery is one-of-a-kind.  Thought goes into creating each piece.  Eileen Doughty shared the decision process that went into making the silk paper earrings that won a jurors' recognition in our show this month.

Eileen said, "I was very pleased to receive jurors' recognition for my silk paper earrings, along with Janet and Ann.  Though my earrings are obviously smaller and less complex, the process still requires many steps and many artistic decisions. Like all of our gallery's fiber art, these are definitely not mass-produced.

"Like Janet, I learned to make silk paper from the master - Robin Russo.  I buy her dyed tussah in a variety of hues.  I choose which colors to combine into a paper, and add embellishments such as specialty threads or dried flower petals.
silk paper
"Deciding to make a set of earrings for our "Wondrous, Lustrous Silk" show, I chose a paper I'd made previously, in dark orange and blue (complementary colors), embellished with a shiny blue thread and copper gilding chips. Next I had to think about what the finished object would look like.  I opted for a 3D shape: cones.  And to make it twice as fun, two stacked cones.  Cutting scrap typing paper into sample cones let me play a bit in order to decide how big to make them,  and how much of a bell opening to have.  When satisfied with my test, I used that paper as pattern for cutting into the silk paper.  The next decision was where on the silk paper to cut, in order to make the most of the variations in its color and embellishment.


"Looking at the silk cut-outs, I thought it needed just a little more interest, and decided to free-motion machine stitch copper thread on the bottom edges.  The cones were stitched closed by hand, and strung on a fine wire with some beads to space them and allow them some movement.  One copper bead is added at the top.  The ear wires are copper, to mesh with the color scheme."

Eileen uses silk paper for other jewelry, such as the necklaces shown below:
Silk Squares

peach necklace

Eileen concludes, "Next time you see some hand-made fiber art, take a moment to think about all the steps and decisions that went into making it.  We love what we make and we hope it shows!"

Thursday, January 12, 2012

Wondrous, Lustrous Silk

A new show opened in our gallery on Monday.  The theme is Wondrous, Lustrous Silk.  The jurors always select three pieces to highlight.  One of those chosen was Janet Barnard's silk paper clutch purse.


Janet says, "I became acquainted with silk paper making when, in 2003, I attended a silk paper workshop at Creative Strands, taught by Robin Russo.  The process was simple and the resulting “paper” was more like heavy fabric, which I felt increased its uses over that of regular paper. 

"The process begins with silk top of noil, bombyx, or tussah, either natural or dyed. I dye my own top using the same method as silk fabric, thereby having access to an infinite number of shades.  The top is then pulled apart and layered on netting, first in one direction, then at a 90 degree angle. This gives the paper added strength and prevents sections from peeling away or splitting.  At this point, embellishments of any type may be added to the surface – string, glitter, leaves etc. A top layer of netting is added to keep everything in place. 

"I wet the top with a mixture of soapy water to break the surface tension, as the silk can be difficult to soak through. Using a paint brush, I saturate the silk with a mixture of Artist’s Medium and water, which binds the silk together.  I hang it to dry, peel off the netting, and it’s ready to go. I’ve used my paper to cover hand-made boxes, for jewelry, cards, sculptures, and now purses."

Here's a sculpture that Janet made using silk paper:


It includes cocoons as an embellishment. These are not dyed; this is their natural color.


Janet has also used silk paper for collages.  Here is an example, "Complete This Series."


Next week, we'll feature another artist who works in silk paper.

Wednesday, October 6, 2010

How to Make Silk Paper

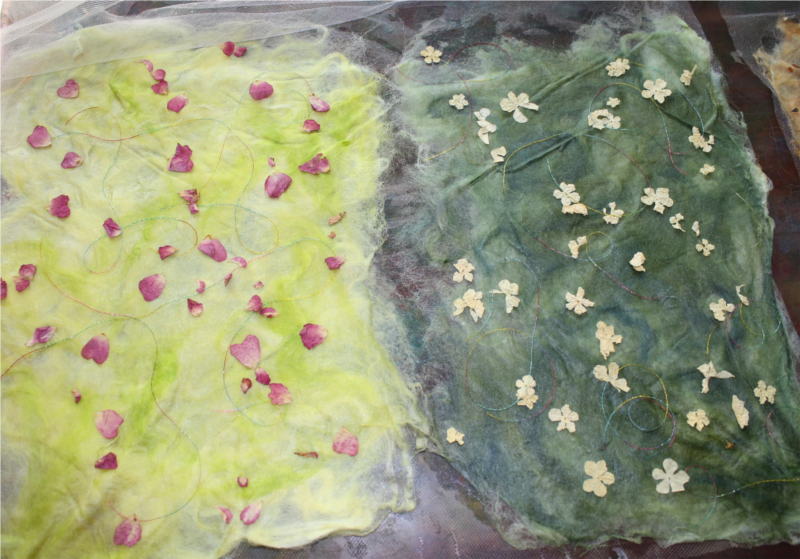
Eileen Doughty shares her process of making silk paper. Each colorful paper is embellished with dried flower blossoms, sequins, gilding chips, or other fibers such as metallic threads. They are sold in the gallery as sheets - or as Eileen's wearable art such as necklaces.

First, set out the gorgeous silk fibers; mine are already hand-dyed by Robin Russo of Vermont.


I cover my work table with a drop cloth and a sheet of plexiglas, as this will get a little messy. Choose a few colors to blend together. On a piece of netting, layer tufts of the fibers.


Fold the netting over the silk fibers to make a sandwich, to hold them in place.


Thoroughly dampen the fibers with water and a little synthrapol, to flatten the piles.


Choose embellishments for each paper. I have a collection of flower petals, seeds and leaves that I organize in envelopes; plus threads, chips, sequins... fun things that will be flat enough for inclusion in paper.


Some of the embellishments, such as threads and sequins, can be added before the first wetting. I gently pull up the netting and add flower blossoms after that step.


A glue medium is brushed on both sides of the paper, which is how everything sticks together. Lots of thinned mediums may be used: textile medium, acrylic varnish, PVA glue, Stiffy, Modge Podge, GAC...


Hang the papers to dry. Newspapers underneath catch the drips. A warm sunny day is ideal, but they can also be dried inside on a line.


When completely dry, gently pull away the netting. It's almost magical!


The papers are stiff enough to use for a variety of purposes. Here's a sneak peak at a necklace Eileen will submit to the next gallery show:


AddThis Social Bookmark Button