Showing posts with label Eileen Doughty. Show all posts

Thursday, January 26, 2012

Design decisions


The fiber art in our gallery is one-of-a-kind.  Thought goes into creating each piece.  Eileen Doughty shared the decision process that went into making the silk paper earrings that won a jurors' recognition in our show this month.

Eileen said, "I was very pleased to receive jurors' recognition for my silk paper earrings, along with Janet and Ann.  Though my earrings are obviously smaller and less complex, the process still requires many steps and many artistic decisions. Like all of our gallery's fiber art, these are definitely not mass-produced.

"Like Janet, I learned to make silk paper from the master - Robin Russo.  I buy her dyed tussah in a variety of hues.  I choose which colors to combine into a paper, and add embellishments such as specialty threads or dried flower petals.
silk paper
"Deciding to make a set of earrings for our "Wondrous, Lustrous Silk" show, I chose a paper I'd made previously, in dark orange and blue (complementary colors), embellished with a shiny blue thread and copper gilding chips. Next I had to think about what the finished object would look like.  I opted for a 3D shape: cones.  And to make it twice as fun, two stacked cones.  Cutting scrap typing paper into sample cones let me play a bit in order to decide how big to make them,  and how much of a bell opening to have.  When satisfied with my test, I used that paper as pattern for cutting into the silk paper.  The next decision was where on the silk paper to cut, in order to make the most of the variations in its color and embellishment.


"Looking at the silk cut-outs, I thought it needed just a little more interest, and decided to free-motion machine stitch copper thread on the bottom edges.  The cones were stitched closed by hand, and strung on a fine wire with some beads to space them and allow them some movement.  One copper bead is added at the top.  The ear wires are copper, to mesh with the color scheme."

Eileen uses silk paper for other jewelry, such as the necklaces shown below:
Silk Squares

peach necklace

Eileen concludes, "Next time you see some hand-made fiber art, take a moment to think about all the steps and decisions that went into making it.  We love what we make and we hope it shows!"

Friday, January 28, 2011

Scale drawings, thumbnail sketches, or no plan at all

Quilters vary widely in how much planning they do before they start cutting fabrics for a quilt. Sometimes a quilter who doesn't like to do detailed plans will depart from her preferred way of working to do a commission or a quilt that has strict constraints.

Our Gallery president, Eileen Doughty, has done a number of public art projects. These usually require lots of planning and coordination with the commissioning agency. For example, Eileen did a commission for the neonatal wing of a large hospital. They requested that the artwork have the four seasons, trees, lots of colors, and fit in a 5 x 14 foot niche. The glass to cover the niche was limited to a four foot width, and so the join lines had to be considered when developing the design. The room decor has 12 hues, around the color wheel. (And there was an extremely tight deadline.) Here is how the finished artwork looks in its location at the hospital:


Eileen discusses her design process for this quilt here.

I (Floris Flam) was commissioned to make a quilt for a residence. It was to hang over the breakfast table and needed to bridge the colors of the kitchen and those of the nearby sitting room. My client and I decided the appropriate size of the quilt and discussed colors that would be used, including the blues of the sitting room and the beiges of the kitchen cabinets. I visited with a collection of blue and beige hand-dyed fabrics and we picked those that were closest to those in her rooms.She didn't give me any other design constraints, so I decided to use as my starting point a collage of magazine illustrations I made some time before as a quick design exercise. Here is my paper collage:

And here is the finished quilt:


You can see that it bears only the most general resemblance to the collage, but having the collage helped me get started, often the hardest part of making any work of art.

Most often, I work without a sketch. I start by selecting colors and fabrics from my stash and begin cutting pieces and pinning them up on my design wall, a felt-covered pinable board. Here is a photo of Autumn View as I was designing it:


I've cut strips and rectangles of fabric and pinned them on my design board (I was at a quilt retreat and was working on a portable board with my pile of fabric on the table in front of it). I added and removed strips of various colors and changed their sizes as I worked, trying as each piece was added to see what seemed to be the necessary next step. When I was pleased with the design, I started sewing everything together. Here is the final quilt:


I've enjoyed this month as your blog editor and am passing the baton to Ruth Blau for the month of February. I'll talk to you again in May.

Thursday, January 6, 2011

Beyond Cotton: Using Unusual Materials in Art Quilts

The general wisdom is that quilts need to be made from 100% cotton fabrics. While this may be good advice for a bed quilt that will need to be washed frequently, quilts for the wall can incorporate a wide range of fabrics and other materials.

One of our Gallery members, Lynda Prioleau, has used unusual items in her quilts to make her point. One example is Are We There Yet? This piece is her tribute to some of the travel that she has taken over the years. It's composed of a worn out inner sole, photo transfers of subway tickets, maps and tokens. Also included are upholstery fabrics, old ties and hand-dyed fabrics.


Lynda incorporated her love of unusual materials in her Shack series. This grouping reflects her love of old, dilapidated buildings. They were created with a photo transfer to fabric of a shack that used to sit where the Gaylord National Hotel is now. She climbed a fence to take the shot and the next day the shack was flattened. These quilts incorporate roofing tiles as well as more common materials such as upholstery fabrics, old ties, hand-dyed fabrics, and buttons. Here is Shack 1:


Another Gallery member, Eileen Doughty, used painted organza woven into hardware cloth in Element. This detail shows her use of these materials:


In Meteor Shower, Eileen used curtain lining material with colored pencil for the umbrellas. Each umbrella is from a country's flag that has a star in the design. She used Angelina, a very fine reflective fiber, to create the sparkle of the meteors.

Another material that can be used on quilts for special effect is painted fusible web (Wonder Under is a common product). In Zen Garden, I used this for the rock at the far left and for the wispy area at the lower right.


This has just scratched the surface of the materials one can find used in art quilts today, but I hope it gives you an idea of the range of possibilities.

This week marks the end of the holiday show at the Gallery. Next Monday, we will jury our new show, Hot Tropics: Warmth in Winter's Freeze. I'll be back with photos after that. In the meantime, stay warm.

Wednesday, October 6, 2010

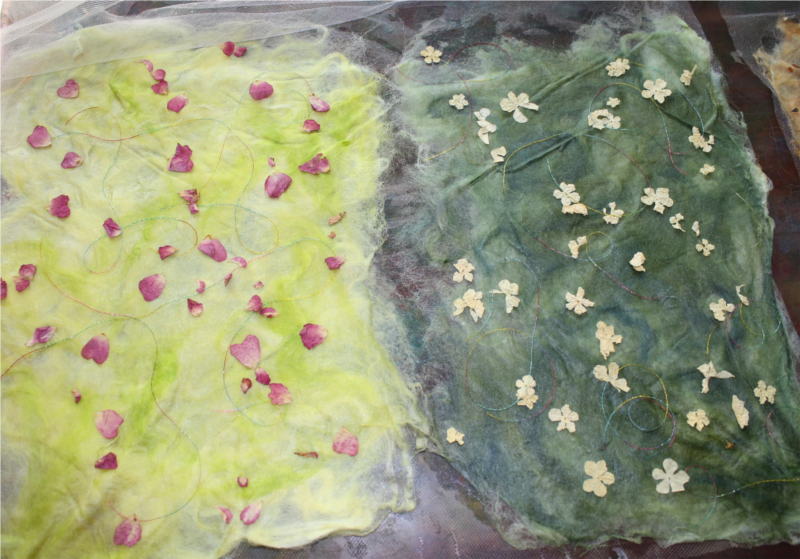
How to Make Silk Paper

Eileen Doughty shares her process of making silk paper. Each colorful paper is embellished with dried flower blossoms, sequins, gilding chips, or other fibers such as metallic threads. They are sold in the gallery as sheets - or as Eileen's wearable art such as necklaces.

First, set out the gorgeous silk fibers; mine are already hand-dyed by Robin Russo of Vermont.


I cover my work table with a drop cloth and a sheet of plexiglas, as this will get a little messy. Choose a few colors to blend together. On a piece of netting, layer tufts of the fibers.


Fold the netting over the silk fibers to make a sandwich, to hold them in place.


Thoroughly dampen the fibers with water and a little synthrapol, to flatten the piles.


Choose embellishments for each paper. I have a collection of flower petals, seeds and leaves that I organize in envelopes; plus threads, chips, sequins... fun things that will be flat enough for inclusion in paper.


Some of the embellishments, such as threads and sequins, can be added before the first wetting. I gently pull up the netting and add flower blossoms after that step.


A glue medium is brushed on both sides of the paper, which is how everything sticks together. Lots of thinned mediums may be used: textile medium, acrylic varnish, PVA glue, Stiffy, Modge Podge, GAC...


Hang the papers to dry. Newspapers underneath catch the drips. A warm sunny day is ideal, but they can also be dried inside on a line.


When completely dry, gently pull away the netting. It's almost magical!


The papers are stiff enough to use for a variety of purposes. Here's a sneak peak at a necklace Eileen will submit to the next gallery show:


AddThis Social Bookmark Button

Sunday, September 26, 2010

Hyperbolic Crochet Coral Reef

Several of our gallery's members (as well as members of our parent guild) contributed their time and talent towards a very unusual upcoming exhibition. The Smithsonian's National Museum of Natural History will display the Hyperbolic Crochet Coral Reef October 16 through April 24, 2011. The Reef is the perfect intersection of advanced mathematics, environmental science, biology, and fiber art. Learn more about the project here.

The mathematical concept of hyperbolic space is best shown in crochet. Who knew! The majority of the pieces donated to the reef are indeed crocheted, but other techniques were also accepted.

This is a classic example, by Debra Lee. The colors represent a "bleached" reef -- where the corals are dying due to increased seawater temperature. (The Smithsonian reef will have three parts: healthy, bleached, and toxic--lots of plastics incorporated.)


Marla Rudnick knits in silver wire. Here's a close-up of one of her creations:


Elida de Souza Moore made a variety of fascinating coral reef shapes.


Eileen Doughty stitched layers of netting and organza, to closely resemble a fragile Glass Sponge.


She also used a sewing machine stitching technique to make vase sponges, entirely out of thread.


The Smithsonian's reef is truly a community project, with hundreds of crafters within a few hundred miles of DC participating. Debra Lee organized seventeen people in her own neighborhood to make nearly 200 pieces! Here's a picture of them all, before being delivered to the Museum. Awesome!


The Hyperbolic Crochet Coral Reef will be a don't-miss event, starting October 16.